Adjusting chain tension
Tools you will need:
24, 14, 12 mm wrench
The official method is, to check chain tension while the bike ist resting on
the sidestand, with no load. Chain movement has to be (as told by Honda)
3.5-4.5 cm, measured in the middle of the lower run of the chain. Movement
is from most bottom to most top. IMHO, 3.5 cm is definitely too less, i.e., chain
is too tight. I normally adjust my chain to appr. 4.5 cm.
Loosen the 24 mm rear axle nut, loosen the 12 mm securing nuts on rear of the tensioners.
While loosening them,  hold the 14 mm adjusting screw.
Now begin adjusting with the left tensioner. Adjust chain tension by turning adjusting
screw, and counting any eighth turning of the nut (clockwise=tighten, counterclockwise=loosen).
When chain tension is good, proceed with the right tensioner. Turn the screw by the same number
of eighths as the left one. Check chain movement around the whole girth of the chain.
Check, if wheel is running straight, or if both sprockets are in straight line, respectively.
This is done most exactly by measuring the distance from middle of swingarm axle nut to middle
of rear wheel axle nut. Has to be the same on both sides, of course. Tighten all nuts (don´t
forget securing nuts ... ). Finally, check chain tension under load, ideally at that point,
where front sprocket axle, swingarm axle and rear wheel axle are in one line. This
is the point of maximum chain tension. Free movement should be appr. 1.5 cm at this
point. Check and adjust rear brake lever play (drum brake only).
hold the 14 mm adjusting screw.
Now begin adjusting with the left tensioner. Adjust chain tension by turning adjusting
screw, and counting any eighth turning of the nut (clockwise=tighten, counterclockwise=loosen).
When chain tension is good, proceed with the right tensioner. Turn the screw by the same number
of eighths as the left one. Check chain movement around the whole girth of the chain.
Check, if wheel is running straight, or if both sprockets are in straight line, respectively.
This is done most exactly by measuring the distance from middle of swingarm axle nut to middle
of rear wheel axle nut. Has to be the same on both sides, of course. Tighten all nuts (don´t
forget securing nuts ... ). Finally, check chain tension under load, ideally at that point,
where front sprocket axle, swingarm axle and rear wheel axle are in one line. This
is the point of maximum chain tension. Free movement should be appr. 1.5 cm at this
point. Check and adjust rear brake lever play (drum brake only).
Cleaning and lubricating chain
For long durability, a chain has to be cleaned and lubricated regularly. Also
an o-ring chain, having it's on grease inside it's roles. But to prevent friction
between chain and sprockets, it has to be lubricated. When using an o-ring or an
x-ring chain, be sure, the lubricant is o-ring safe. Don't use any stuff like
that old-fashioned chain grease, coming in big flat cans, by Castrol, f.e. This
grease you have to warm up, put the chain into and "boil" it. It's probably the best
you can do to a non-o-ring chain,
but it will damage the o-rings. Probably the best chain spray is a teflon
(PTFE) based one. Chain has to be lubricated at least every
500 km or more often, depending on environmental conditions (heat, rain ...).
Best check lubrication at any fuel stop.
Spray the inner part of the chain (i.e., the one being in contact to the sprockets)
on the lower run. Spraying outer part, makes no sense, since lubricant won't reach
the sprockets ... Wait some 15 minutes before riding off, to give solvents
the chance to evaporate.
Before lubricating, you may want to clean the chain. Don't use fuel for this,
best stuff for cleaning is paraffin (kerosene, Petroleum in German). The second
best is Diesel fuel. Use a brush. BTW, there's no need to remove chain for cleaning.
If not feeling like always lubricating your chain by hand, you may use an
automatic chain lubricating system. I'm using Scottoiler,
and after being sceptical before, I must say, it's a good thing. Currently, in August '98,
I'm using it for 7 month/12,800 km. I had to adjust chain tension just once, at
9,000 km. After getting no more than 16-18,000 km out of a chain before, due to extensive off-road riding ;-), I'm now expecting
remarkably more than 20,000 km. A tank full (50 cc) will last for appr. 1,000 km,
a can of genuine Scott oil (0.5 l) is for DEM 19.-. It's a lot of money, but next
I'll try chainsaw oil. It should work as well, it's a biological oil (thus, uncritical
against environment and o-ring safe), and it's cheaper (DEM 5.-/l).
BTW, stock chain guard is a mess. The lower run of the chain will always be "showered"
by water and dirt.
See, what Carlo did ...
How can I tell my chain is worn out?
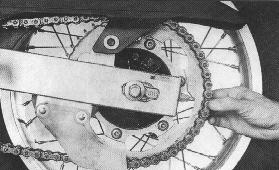
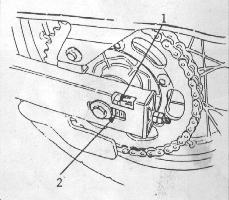 There's a little sticker on the left side of the
swingarm (1), coloured either blue or green/red. As long as chain tensioner's
indicator (2) is pointing inside the blue/green surface, everything is ok. If it
surpasses the right (back) edge of that surface, chain and sprockets have to be
replaced. At least, the manual is reading like that ... IMHO, this is kinda commercial
indicator, normally you can ride at least another 1,500 or 2,000 km.
There's a little sticker on the left side of the
swingarm (1), coloured either blue or green/red. As long as chain tensioner's
indicator (2) is pointing inside the blue/green surface, everything is ok. If it
surpasses the right (back) edge of that surface, chain and sprockets have to be
replaced. At least, the manual is reading like that ... IMHO, this is kinda commercial
indicator, normally you can ride at least another 1,500 or 2,000 km.
However, there are some certain signs, telling you, that your chain set (always
replace chain and sprockets!) has to be replaced:
- If you can't adjust tension anymore (then it's high time to replace it ...)
- If your sprockets are looking like section 1 or 2 on
on the sprocket pic.
Another picture from real life:
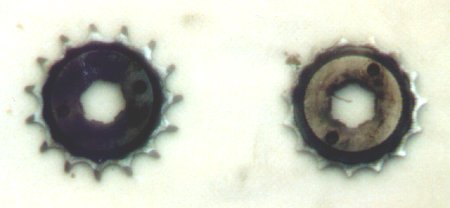
The
left sprocket shows those "shark teeth", and the right one - hm, call it
caries ;-)). Of course, both of them are worn, and of course the right one is more
worn ...
- Try to lift the chain off the rear sprocket (at 3 o'clock position).
If you can lift it off by 5 mm or more, replace the set.
- If you can't adjust chain tension constantly along the whole girth.
What does that mean? A chain tends to wear uneven with the time. Before
adjusting it, find the place of smallest bottom-top movement. Adjust the
tension, and check around the whole girth. When finding, that movement
is remarkably too large at another place of the chain, it has to be
replaced. Don't try to adjust tension to correct value at this place! On
the other place, with smaller movement, it will be too tight then, with
the risk of damaging the gear shaft's seal ring.
How to replace the chain
Coming soon .. Please be patient ...